Modify CreateBy,UpdateBy SharePoint Lists & Document Library

on Sunday, September 27, 2009

Can we update the values of "Created By", "Modified By" columns in SharePoint lists ?


Ofcourse, you can. Created By & Modified By columns are "Person or Goup" type columns. In SharePoint all the lists has these columns by default. You can't update the values of these columns from UI. But, you can do it through SharePoint APIs.

I have created .NET windows based application to update the "created by" and "modified by" columns using SharePoint APIs. I am giving the sample code snippet below. 

/******** Code snippet for modifying the Created by and Modified by column values of a SharePoint List *******/

/******** Written in .Net Windows Based Application **********/


private void button3_Click(object sender, EventArgs e)

        {

            SPSite oSite = new SPSite("http://<SiteName>/");

            SPWeb oWeb = oSite.OpenWeb();

            SPList oList = oWeb.Lists["TestCustomList"];

            SPListItemCollection oListCollection = oList.Items;

            foreach (SPListItem oListItem in oListCollection)

            {

                SPFieldUserValue oUser = new SPFieldUserValue(oWeb, oWeb.CurrentUser.ID, oWeb.CurrentUser.LoginName);

   // or you can hard code the value like this,

 SPFieldUserValue oUser = new SPFieldUserValue(oWeb, 14, "Milap Shah");

                oListItem["Author"] = oUser;//created by column value = "19;#domain\mishah"

                oListItem["Editor"] = oUser;//modified by column value = "19;#domain\mishah"               

                oListItem.Update();               

            }


            oWeb.Update();

         }


//alternate method

SPSite oSite = new SPSite("http://<site URL>");

SPWeb oWeb = oSite.OpenWeb();

SPList oList = oWeb.Lists["TestDocLibrary"];

SPListItem oListItem = oList.Items.GetItemById(5);


oListItem["Editor"] = oWeb.CurrentUser.ID; //"19;#domain\mishah";


oListItem.Update(); 


The above code will not update the "created by" column of document library type SharePoint lists. The above code (both) will work just fine for all the lists and even it will update the "Modified by" column in SharePoint document libraries.


To Modify CreateBy and UpdateBy fields of Document Library you could use following code base.

site = new SPSite("http://amishah:1982/");
//connectedUser = WindowsIdentity.GetCurrent();
Console.WriteLine(System.Security.Principal.WindowsIdentity.GetCurrent().Name);
web = site.OpenWeb();
SPList list = web.Lists["Source"];
SPFieldUserValue oUser = new SPFieldUserValue(web,19,"domain\mishah");19;#domain\mishah
SPListItem newItem = list.RootFolder.Files.Add("a1" + DateTime.Now.ToString("MMddyyyyHHmmss"), new byte[] { 1 },oUser.User,oUser.User,DateTime.Now,DateTime.Now).Item;


Vedant has posted a work-around to accomplish this update and you can find it out here


If anyone one want to know how we can do this same functionality using Powershell (codename : Monad) please see Tedd's post : http://blogs.msdn.com/tadd/archive/2008/05/22/updating-the-created-by-and-modified-by-columns-in-sharepoint-lists.aspx


SPPersisted Object vs PropertyBags

on Friday, September 25, 2009

Hierarchical object store vs Property bag

We find, when building MOSS solutions, that we generally have a need for configuration information stores at four different levels:

  • Web application level
  • Site collection level
  • Site level
  • List level

There are lots of options when it comes to choosing configuration information stores, but at the web application level SharePoint offers two choices that are quite natural: the <AppSettings> section of the web application web.config file and the hierarchical object store.

Of these two options, the hierarchical object store is by far the lesser known of the two. To put it shortly, the hierarchical object store offers a framework that allows third party applications to store configuration information by creating a class that inherits from the SPPersistedObject class in the Microsoft.SharePoint.Administration namespace. You can find more information about it here: http://www.bluedoglimited.com/SharePointThoughts/ViewPost.aspx?ID=271.


You should also take a look at http://www.codeplex.com/features, which contains a feature called "Manage Hierarchical Object Store" that offers a user interface for managing web application configuration information that is ultimately stored in the hierarchical object store. This example would be quite easy to adjust so that it caters the management of configuration info at different levels as well.

If you look at the site and list level, besides the hierarchical object store, you have another option offered by SharePoint: the property bag. At the site level, it can be accessed via the Properties property of an instance of the SPWeb class. Instances of SPList classes don’t have a property bag associated to it. However, list items do have such a property bag. Therefore, using the property bag of the root folder of a list is a natural alternative if you want to store list level configuration information.

Since we were curious how the performance of the hierarchical object store and the property bag compare to each other, we’ve devised a simple performance test incorporated in a console application. The console application stores and retrieves config info at the list level and uses three different methods for storing the data:

  • Storage in a single property in the property bag using XML serialization
  • Storage in the hierarchical object store
  • Storage in multiple properties in the property bag

We’re sharing the results of this simple test with you in this article.

Creating a persistable object

First, we’re creating a class that contains 10 fields that need to be persisted in the hierarchical object store. In order to do so, we’re creating a class that inherits from the SPPersistedObject class. The class will contain two constructors; one that is required by the SPPersistedObject and an empty constructor that needs to be there for serialization purposes. Every field that needs to be persisted needs to be decorated with the [Persisted] attribute. The end result is the following class:

using System;

using System.Collections.Generic;

using System.Linq;

using System.Text;


using Microsoft.SharePoint;

using Microsoft.SharePoint.Administration;


namespace HObjectStore

{

 public class PersistStore : SPPersistedObject

 {

  [Persisted]

  public int number1 = 1;

  [Persisted]


  public int number2 = 1;

  [Persisted]

  public int number3 = 1;

  [Persisted]

  public int number4 = 1;

  [Persisted]

  public int number5 = 1;

  [Persisted]

  public int number6 = 1;


  [Persisted]

  public int number7 = 1;

  [Persisted]

  public int number8 = 1;

  [Persisted]

  public int number9 = 1;

  [Persisted]

  public int number10 = 1;


#region ctor


  //Exists for serialization purposes.

  public PersistStore ()

  {

  }


  public PersistStore(string strName, SPPersistedObject objParent, Guid objGuid)

  : base(strName, objParent, objGuid)

  {

  }

#endregion


 }

}

This class is quite simple to build, and quite simple to use as well. You can create a new instance of our PersistStore class by passing a key, a parent that also inherits from SPPersistedObject (which seems to hold true for many classes in the Microsoft.SharePoint.Administration namespace, in this example we’ll use an SPWebApplication object) and a GUID. Please note that the GUID needs to be unique, you can’t reuse the same GUID and use a different key. So, instantiating a PersistStore object looks something like this (where objSite is an instance of an SPSite object):

PersistStore objTest2 = new PersistStore("MyKey", objSite.WebApplication, objList.ID);

If you’ve already persisted info, you need to retrieve it from the hierarchical object store via its key, like so:

PersistStore objTest2 = objSite.WebApplication.GetChild("MyKey");


If you want to persist a persistable object in the hierarchical object store, all you need to do is call the Update() method (defined in the SPPersistedObject class), like so:

objTest2.Update();

Finally, you can delete persisted info by calling the Delete() and Unprovision() methods, also defined in the SPPersistedObject class. The code for doing this is shown here:

objTest2.Delete();

objTest2.Unprovision();

As you’ve seen, interacting with the hierarchical object store isn’t hard to do. We’ll be revisiting this code later in our performance test.


XML Serializing info in a single property of the property bag

We’ll also be building a class that we’ll XML serialize and store in a property of the RootFolder property bag of a list. The class itself, which we’ll call SerializeClass, is very simple. It contains 10 fields that’ll be persisted:

using System;

using System.Collections.Generic;

using System.Linq;

using System.Text;


namespace HObjectStore

{


 public class SerializeClass

 {

  public int number1 = 1;

  public int number2 = 1;

  public int number3 = 1;

  public int number4 = 1;

  public int number5 = 1;

  public int number6 = 1;

  public int number7 = 1;


  public int number8 = 1;

  public int number9 = 1;

  public int number10 = 1;

 }

}

We’ve found some code that’s able to handle the XML serialization at http://www.dotnetjohn.com/articles.aspx?articleid=173, which saves us the trouble of explaining it. We won’t list the code here, but will include it in our test code. For now, it suffices to know that this solution is more complex and requires more code. If you want specifics about this topic, please refer to the aforementioned article.

Storing info in multiple properties of the property bag


Storing info in multiple properties of the property bag is the easiest scenario of the three. Our test application wants to store list specific configuration information. Since instances of the SPList class don’t have a property bag, we’ll use the property bag of the rootfolder instead. The following code shows how to read a property that contains an integer from the root folder property bag:

SPFolder objFolder = objList.RootFolder;

if (objFolder.Properties.Contains("number9"))

{

 int9 = Convert.ToInt32(objFolder.Properties["number9"]);

 int9++;

}

The following code shows how to add a value in the root folder property bag:


objFolder.Properties["number10"] = int10;

objFolder.Update();

So, that’s that, and we’ll see this code again in the "Creating a performance test" section.

Creating a performance test

Our performance test executes tests for all three scenarios we’ve described. The first test does XML serialization, the second test uses the hierarchical object store and the third test uses multiple properties to store single values. If you’ve read the article so far, you should be able to understand the code. If not, just skip this section and look at the "Results" section.

using System;

using System.Collections.Generic;

using System.Linq;


using System.Text;

using System.IO;

using System.Xml;

using System.Xml.Serialization;

using System.Diagnostics;

using Microsoft.SharePoint;

using Microsoft.SharePoint.Administration;


namespace HObjectStore

{


 class Program

 {

  static void Main(string[] args)

  {

   try

   {

    Stopwatch objTimer1 = new Stopwatch();

    Stopwatch objTimer2 = new Stopwatch();

    Stopwatch objTimer3 = new Stopwatch();


    int intRuns = 20;

    string TEST_KEY = "TestAppSetting";

    Guid objParentId = new Guid();

    Guid objListId = new Guid();


    using (SPSite objSite = new SPSite("[your server]"))

    {

     SPWeb objWeb = objSite.OpenWeb();

     SPList objList = objWeb.Lists["Suggestions"];


     objTimer1.Start();


     for (int i = 0; i < intRuns; i++)

     {

      SerializeClass objTest1;


      string strXmlSerializedObject = null;

      if (objList.RootFolder.Properties.Contains(TEST_KEY))

      {

       strXmlSerializedObject = objList.RootFolder.Properties[TEST_KEY].ToString();

      }


      if (strXmlSerializedObject == null)

      {

       objTest1 = new SerializeClass();

      }

      else

      {

       objTest1 = (SerializeClass)DeserializeObject(strXmlSerializedObject);

      }


      //Change object


      objTest1.number1++;

      objTest1.number2++;

      objTest1.number3++;

      objTest1.number4++;

      objTest1.number5++;

      objTest1.number6++;

      objTest1.number7++;

      objTest1.number8++;

      objTest1.number9++;


      objTest1.number10++;


      //Serialize object.

      String XmlizedString = null;

      MemoryStream memoryStream = new MemoryStream();

      XmlSerializer xs = new XmlSerializer(typeof(SerializeClass));

      XmlTextWriter xmlTextWriter = new XmlTextWriter(memoryStream, Encoding.UTF8);

      xs.Serialize(xmlTextWriter, objTest1);

      memoryStream = (MemoryStream)xmlTextWriter.BaseStream;

      XmlizedString = UTF8ByteArrayToString(memoryStream.ToArray());


      // Save serialized object.

      objList.RootFolder.Properties[TEST_KEY] = XmlizedString;

      objList.RootFolder.Update();

     }
     objTimer1.Stop();


     objParentId = objSite.WebApplication.Id;

     objListId = objList.ID;


     objTimer2.Start();

     for (int i = 0; i < intRuns; i++)


     {

      PersistStore objTest2 = objSite.WebApplication.GetChild(TEST_KEY);


      if (objTest2 == null)

      {

       objTest2 = new PersistStore(TEST_KEY, objSite.WebApplication, objList.ID);

      }


      objTest2.number1++;

      objTest2.number2++;


      objTest2.number3++;

      objTest2.number4++;

      objTest2.number5++;

      objTest2.number6++;

      objTest2.number7++;

      objTest2.number8++;

      objTest2.number9++;

      objTest2.number10++;

      objTest2.Update();


      //Use the following code to delete info

      //objTest2.Delete();

      //objTest2.Unprovision();


     }

     objTimer2.Stop();


     SPFolder objFolder = objList.RootFolder;

     objTimer3.Start();

     for (int i = 0; i < intRuns; i++)


     {

      int int1 = 1;

      int int2 = 1;

      int int3 = 1;

      int int4 = 1;

      int int5 = 1;

      int int6 = 1;

      int int7 = 1;

      int int8 = 1;


      int int9 = 1;

      int int10 = 1;


      if (objFolder.Properties.Contains("number1"))

      {

       int1 = Convert.ToInt32(objFolder.Properties["number1"]);

       int1++;

      }

      objFolder.Properties["number1"] = int1;


      if (objFolder.Properties.Contains("number2"))


      {

       int2 = Convert.ToInt32(objFolder.Properties["number2"]);

       int2++;

      }

      objFolder.Properties["number1"] = int1;

      if (objFolder.Properties.Contains("number1"))

      {

       int1 = Convert.ToInt32(objFolder.Properties["number1"]);

       int1++;


      }

      objFolder.Properties["number2"] = int2;


      if (objFolder.Properties.Contains("number3"))

      {

       int3 = Convert.ToInt32(objFolder.Properties["number3"]);

       int3++;

      }

      objFolder.Properties["number3"] = int3;


      if (objFolder.Properties.Contains("number4"))


      {

       int4 = Convert.ToInt32(objFolder.Properties["number4"]);

       int4++;

      }

      objFolder.Properties["number4"] = int4;


      if (objFolder.Properties.Contains("number5"))

      {

       int5 = Convert.ToInt32(objFolder.Properties["number5"]);

       int5++;


      }

      objFolder.Properties["number5"] = int5;


      if (objFolder.Properties.Contains("number6"))

      {

       int6 = Convert.ToInt32(objFolder.Properties["number6"]);

       int6++;

      }

      objFolder.Properties["number6"] = int6;


      if (objFolder.Properties.Contains("number7"))


      {

       int7 = Convert.ToInt32(objFolder.Properties["number7"]);

       int7++;

      }

      objFolder.Properties["number7"] = int7;


      if (objFolder.Properties.Contains("number8"))

      {

       int8 = Convert.ToInt32(objFolder.Properties["number8"]);

       int8++;


      }

      objFolder.Properties["number8"] = int8;


      if (objFolder.Properties.Contains("number9"))

      {

       int9 = Convert.ToInt32(objFolder.Properties["number9"]);

       int9++;

      }

      objFolder.Properties["number10"] = int10;


      objFolder.Update();


     }

     objTimer3.Stop();


     Console.WriteLine(objTimer1.ElapsedMilliseconds);

     Console.WriteLine(objTimer2.ElapsedMilliseconds);

     Console.WriteLine(objTimer3.ElapsedMilliseconds);

    }

   }

   catch (Exception err)

   {


    Console.Write(err.Message);

   }

  }


  /// <summary>

  /// To convert a Byte Array of Unicode values (UTF-8 encoded) to a complete String.

  /// </summary>

  /// <param name="characters">Unicode Byte Array to be converted to String</param>


  /// <returns>String converted from Unicode Byte Array</returns>

  //taken from: http://www.dotnetjohn.com/articles.aspx?articleid=173

  private static String UTF8ByteArrayToString(Byte[] characters)

  {

   UTF8Encoding encoding = new UTF8Encoding();

   String constructedString = encoding.GetString(characters);

   return (constructedString);


  }


  /// <summary>

  /// Converts the String to UTF8 Byte array and is used in De serialization

  /// </summary>

  /// <param name="pXmlString"></param>

  /// <returns></returns>


  //taken from: http://www.dotnetjohn.com/articles.aspx?articleid=173

  private static Byte[] StringToUTF8ByteArray(String pXmlString)

  {

   UTF8Encoding encoding = new UTF8Encoding();

   Byte[] byteArray = encoding.GetBytes(pXmlString);

   return byteArray;

  }


  public static Object DeserializeObject(String pXmlizedString)

  {


   XmlSerializer xs = new XmlSerializer(typeof(SerializeClass));

   MemoryStream memoryStream = new MemoryStream(StringToUTF8ByteArray(pXmlizedString));

   XmlTextWriter xmlTextWriter = new XmlTextWriter(memoryStream, Encoding.UTF8);

   return xs.Deserialize(memoryStream);

  }

 }

}

In the next section (called "Results") we’ll discuss what we’ve found when executing this test harness.


Results

The results of our test runs were, at least to us, quite surprising. The results are shown in the next table. It contains the number of runs. For instance, we’re updating and saving 10 properties. If we repeat this process 5 times, the number of test runs is 5.


(runs no)\(scenario)
XML serialize
Hierarchical store
Multiple props

2 runs

1689 msec

302 msec

46 msec

2 runs

1695 msec

334 msec

66 msec

10 runs

1887 msec

1398 msec

123 msec

10 runs

2122 msec

983 msec

275 msec

50 runs

2267 msec

4828 msec

602 msec

50 runs

2314 msec

CRASH

-


As you can see, XML serialization isn’t that fast, but it doesn’t become much slower either. It’s pretty stable and in the end, doing 50 test runs, it surpasses the performance of the hierarchical object store. Storing values in multiple properties in the property bag of the root folder turns out to be very fast and it’s stable too. The hierarchical object store is, at first, a lot faster than XML serialization, but never as fast as the multiple properties scenario. This mechanism isn’t quite as stable as the other two, its test performance results tend to fluctuate more. Then, when doing 50 test runs, the hierarchical object store scenario crashes badly and stays crashed, resulting in the following error message:

"An update conflict has occurred, and you must re-try this action. The object PersistStore Name=TestAppSetting Parent=SPWebApplication Name=[name of web application] is being updated by [domain]\[username], in the HObjectStore.vshost process, on machine [server name]. View the tracing log for more information about the conflict."

Based on these results, we’re guessing you’re better of storing site and list configuration info in the property bag instead of in the hierarchical object store as it seems to offer better scalability and more robustness.

Alternate Access Mapping SharePoint

What every SharePoint administrator needs to know about Alternate Access Mappings

Today I'd like to talk about one of the most powerful, but often one of the least understood, features in Windows SharePoint Services 3.0 and Microsoft Office SharePoint Server 2007. That feature is called Alternate Access Mappings. Around here, we just call it "AAM" for short.


At the most basic level, AAM tells SharePoint how to map web requests (for example, browsing to the homepage of a SharePoint site) to the correct web application and site so that SharePoint can serve the correct content back to you. It then tells SharePoint what URL the users should be taken to as they interact with SharePoint.

Seems simple enough, doesn’t it? Those of you who are familiar with developing web applications in Internet Information Services may be wondering right now why we need such a feature since IIS can tell you what the URL of an incoming web request is. The major reason we need this is that there are common Internet deployment scenarios where the URL of a web request received by IIS is not the same URL that the end user entered. These are most common in reverse proxy publishing and load balancing scenarios.

How is this possible? Let's consider a reverse proxy scenario. A reverse proxy is a device that sits between end users and your web server. All requests to your web server are first received by the reverse proxy device, and if those requests pass the proxy's security filtering, the proxy will forward the requests on to your web server. Reverse proxies can perform advanced functionality such as receiving a web request over the Internet via SSL (HTTPS), but forward the request to the your server via HTTP. This is referred to as off-box SSL termination. They can also forward the request to a different port number than it was originally received on and can even change the HTTP Host header field. If SharePoint were base its links off of the URL of the request it received, the links that end users click on could be the incorrect "internal" URL rather than the correct "public" URL.

SharePoint is compatible with a variety of reverse proxy servers, but for this example we'll take a look at a publishing rule from Microsoft's reverse proxy software - Internet Security and Acceleration Server 2006. ISA Server 2006 includes a SharePoint publishing wizard that walks you through creating a publishing rule for SharePoint. Once the rule is created, you can modify it at any time. (The following images show a slightly modified publishing rule where the "Forward the original host header" option is turned off to help demonstrate the flexibility of AAM. If we left the "Forward the original host header" option turned on, the public hostname would also serve as the internal hostname when configuring AAM.) The first two dialogs show the "listener" and "public name" properties of the rule, which define what URL users will use to access your SharePoint site. Remember that this URL is really the URL of your reverse proxy server, which will forward the request to your SharePoint server.
listener highlighted.PNGpublic name highlighted.png

The end user's URL is comprised of the public protocol, the public hostname, and the public port number.


Public Protocol


+


"://"


+


Public Hostname


+


":"


+


Public Port Number


=


Public URL


HTTPS


www.contoso.com


443


https://www.contoso.com

The next two dialogs show the "to" and "bridging" properties of the rule, which define what URL the reverse proxy server will use to forward the request to your SharePoint server.

bridging highlighted.pngto highlighted.png

The SharePoint server's URL is comprised of the internal protocol, the internal hostname, and the internal port number.


Internal Protocol


+


"://"


+


Internal Hostname


+


":"


+


Internal Port Number


=


Internal URL


HTTP


sharepoint.dmz.contoso.com


80


http://sharepoint.dmz.contoso.com

extend web application highlighted.png

Great - we've properly set up this reverse proxy server to receive web requests from end users at https://www.contoso.com and forward them to your SharePoint server at http://sharepoint.dmz.contoso.com. We're halfway there! The next step is to configure your SharePoint web application and AAM to match the publishing rule above. To do this, we'll extend an existing web application to an additional IIS Web site just for your reverse proxy's publishing rule. Note that you're also able to create a new web application from scratch for this publishing rule - the fields you'll need to fill out are the same in either case.

Browse to your WSS 3.0 Central Administration site and click on the Application Management tab. Next, click "Create or extend Web application" and then click "Extend an existing Web application." Select the web application that you wish to use, and then fill out the port, host header, and SSL fields based on the internal URL properties that we defined above. In the URL field, enter the public URL that we defined above. Finally, you'll want to select an AAM Zone to assign this extension of your web application to. There are a maximum of 5 zones available in each web application. We'll use the Internet zone in this example, but you're free to use any available zone. All of the zones provide the same functionality, although the Default zone will always be used for certain features such as sending administrative e-mail messages to site collection owners. When you're finished, click OK to create the IIS Web site.

Next, you'll want to verify that your public URL was created correctly in AAM and then add your internal URL. Unless your internal URL is the same as your public URL, this is an extra step that you must perform manually. To do this, browse to your WSS 3.0 Central Administration site and click on the Operations tab. Next, click "Alternate access mappings." Click the Alternate Access Mappings selector drop-down and select the web application that you're publishing through your reverse proxy server. You should now see the AAM URLs assigned to your web application.

AAM before.png

As you can see, the public URL from the reverse proxy publishing rule has been assigned to your web application's Internet zone. The final touch is to add the internal URL from the reverse proxy publishing rule to your web application's Internet zone. To do this, click "Add Internal URLs" in the AAM toolbar, type in the internal URL, and select the same zone that you used for the public URL. In this case, that was the Internet zone. When you're finished, click Save. You should now see the additional URL is assigned to your web application, in the same zone as the public URL of your reverse proxy publishing rule.

AAM after.png

All done! Now, when a user browses to https://www.contoso.com, the web request will be received by the proxy server and forwarded to http://sharepoint.dmz.contoso.com. SharePoint will then receive the web request, see that the URL of the request is http://sharepoint.dmz.contoso.com, find that this URL is assigned to the Contoso web application, and return the content from that web application. In addition, because the http://sharepoint.dmz.contoso.com URL is assigned to the Internet zone, SharePoint will also generate links on the pages using the public URL for that zone - https://www.contoso.com. This ensures that end users are taken to the proper URL when clicking on links on the page.

Load balancers work similarly, especially if they overwrite the end user's original URL with the URL of the individual web server that the request is being load balanced to. To address this, just add each individual web server's URL to AAM as an internal URL and associate them all to the same zone as end user's public URL.

I hope that this introduction to Alternate Access Mappings was helpful to you. Please feel free to post comments to this blog entry with any questions you may have about AAM. I will be posting another blog entry soon covering common AAM mistakes and how to avoid them.

Managed Paths: How to change sites to something else

on Thursday, September 24, 2009


In many of the SharePoint web applications which have more than one site collections you see "sites" in the path.
http://server/sites/sitecollection1
http://server/sites/sitecollection2 etc.

So I was curious that what if someone wants to change it and make it more meaningful like In a School they want to have school name instead of that. That's where Managed Paths comes into Play.

Central Administration --> Application Management --> Define Managed Paths.

You can specify two kind of Paths

Explicit Inclusion

:means that whatever mentioned in here is actually a site collection

WildCard Inclusion

: means that All children of whatever mentioned here are site collections.

By defining managed paths, you can specify which paths in the URL namespace of a Web application are used for site collections. You can specify that one site collection or more than one site collection exists at a specified path. For example, an explicit path of hr indicates that the URL http://server/hr is a site collection, whereas a wildcard path of "sites" indicates that child URLs of http://server/sites/, such as server/sites/team, are site collections.

Important:
Do not use “/*” to indicate wildcard managed sites at the root of the site collection. Using this wildcard prevents a site being created at the root of the Web application. Many SharePoint features rely on having a site collection at the root of the Web application, and if this is missing, these features will not work correctly. For example, Explorer View will not work for a document library.


1.On the top navigation bar, click Application Management.

2.On the Application Management page, in the SharePoint Web Application Management section, click Define managed paths.

3.On the Define Managed Paths page, if you want to define managed paths for a Web application other than the one that is selected, in the Web Application section, click Change Web Application on the Web Application menu.

◦On the Select Web Application page, click the Web application for which you want to define managed paths.

4.In the Included Paths section, to delete a path or paths, select the check boxes for the paths that you want to delete and then click Delete selected paths.

5.In the Add a New Path section, to include a new path within the URL namespace, type the path in the Path box.

6.Click Check URL to check the URL. A Web browser will open to the specified path.

7.In the Type list, click one of the following:

◦Wildcard Inclusion. Select this option to include all paths that are subordinate to the specified path.

◦Explicit Inclusion. Select this option to include the site that is indicated by the specified path. Sites subordinate to the specified path are not included.

8.Click OK.

Forms Based Authentication for SharePoint Site

SharePoint 2007 is the latest release of Microsoft's enterprise collaboration suite, which tightly integrates with the Microsoft Office Suite and allows organizations to establish well-managed corporate knowledge from the darkest depths of informational chaos. At least that's Microsoft unbiased opinion. In my experience, SharePoint 2007 is a major improvement over its predecessor, but it still takes a bit of know-how to make it work.

The latest rendition of SharePoint is built on top of ASP.NET 2.0, so ASP.NET developers should feel right at home developing against, and customizing, SharePoint 2007. In fact, some of the "latest technologies" in SharePoint, like Master Pages and Forms Authentication, are "not-quite-the-latest technologies" from ASP.NET. In this article, I'll cover some of the quirks to Forms Authentication that you will doubtless encounter when trying to set it up in SharePoint.

A step-by-step guide to configuring Forms authentication in SharePoint 2007

Following is a checklist for setting up Forms Authentication in SharePoint 2007

  1. Setup the membership data store
  2. Add a new user to the membership data store
  3. Configure SharePoint Central Administration web.config
  4. Configure the SharePoint site's web.config
  5. Enable Forms authentication on the SharePoint site
  6. Authorize the Forms-based user to access the site
  7. Login

In this article, we will be using the SQL Server membership provider to authenticate users, but you can use any membership provider that you so choose. The steps involved will be about same, but the specifics of those steps may change depending on your provider. I'm also assuming that you've already installed SharePoint and created the SharePoint site on which you're trying to enable forms authentication.

Step 1: Setup the membership data store

Before you can use the SQL Server membership provider, you have to set up the database that the provider uses to store member and role information. Microsoft ships a handy tool named the ASP.NET SQL Server Setup Wizard along with the .NET Framework, which will guide you through the process of creating the table structure and stored procedures required for the provider. You can launch the wizard by running aspnet_regsql.exe from the .NET Framework folder, which is normally found in the following location:

<WindowsDirectory>\Microsoft.NET\Framework\<version>\aspnet_regsql.exe
C:\Windows\Microsoft.NET\Framework\v2.0.50727\aspnet_regsql.exe

When you launch the wizard, the "Welcome" screen appears and tells you all sorts of useful things about what the wizard does and the command line parameters you can use to get more options. It makes for great reading. When you've satisfied your literary pallet, click the Next button to display the "Select a Setup Option" screen (Figure 1).

Figure 1 – ASP.NET SQL Server Setup Wizard – Select a Setup Option screen

From the "Select a Setup Option" screen, choose the "Configure SQL Server for application services" option button. This lets the wizard know you want to add new tables and stored procedures to a membership database. You can also use the wizard to remove the table structure and delete all data in the database, but we don't need to deal with that right now. If you accidentally add the structure to the wrong dataset, you may have to deal with it later. Click "Next" to move to the "Select the Server and Database" screen (Figure 2).

Figure 2 – ASP.NET SQL Server Setup Wizard – Select the Server and Database screen

Enter the name of your database server in the Server textbox to let the wizard know which SQL Server it needs to access. Then enter or select a database name in the Database combo box. The combo box displays a drop down containing a list of existing databases. If you want to add the tables and stored procedures for the provider to an existing database, select the database from the list. If you want to create a new database, then just type the name of the new database directly in the combo box and the wizard will create the database automatically. You may also need to enter SQL Server authentication credentials if you connect to the database using SQL Server authentication instead of Windows authentication. These credentials are not used outside of the wizard, so it won't affect your SharePoint configuration one way or the other. Click the Next button to continue to the "Confirm Your Settings" screen.

The "Confirm Your Settings" screen displays a summary of the epoch-defining choices you've made thus far in the wizard. In other words, the server and database name. If you're feeling hesitant about either, then this is your chance to back out. When you've got your courage built up, click the Next button.

In about a second, or about one and half seconds if you're using a Virtual PC image (like me), the wizard creates all of the tables and stored procedures required by the membership provider. If it takes longer than that, you've entered a setting incorrectly and the wizard is waiting to time out (or you have a really slow machine). The wizard then displays a final status screen indicating success or failure. If the wizard fails, it details the reasons why so you can fix the problem. There are only six settings in the entire wizard (if you count option buttons as "settings") so you should have a sporting chance at troubleshooting the problem. The success screen just tells you that everything worked and to click the Finish button.

At this point, the database you selected is populated with the proper table structure and stored procedures required by the provider, so now you can add a user to the membership database.

Step 2: Add a user to the membership data store

In IIS 7.0, there is a convenient "Add User" feature that uses the membership provider configured for the website to create a user. Unfortunately, IIS 7.0 isn't available for Windows Server 2003 so, in a production environment, you're probably stuck with IIS 6.0, which doesn't have a comparable add user feature. This makes adding users a bit tedious, but here's how you do it.

  1. Create a new ASP.NET web application
  2. Configure the new application for Forms authentication and point it at your newly-created membership database
  3. Copy the machine key element from your SharePoint site's Web.config into to your new web application
  4. Add users and roles using the ASP.NET Web Site Administration Tool (if you have Visual Studio 2005 handy) or create users via the CreateUserWizard ASP.NET control.

I'm assuming you know how to create a new web site, so I'm not delving into any of the specifics of step 1. Once you have the website created, add a new Web.config to the application root and add the following configuration setting to the file:

Listing 01 – Web.config for the User Creation Website

<?xml version="1.0"?>
<configuration xmlns="http://schemas.microsoft.com/.NetConfiguration/v2.0">
   <connectionStrings>
      <add name="MembershipDatabaseCNX" connectionString="SERVER=localhost;
DATABASE=MembershipDatabase; TRUSTED_CONNECTION=true;"/>
   </connectionStrings>
   <system.web>
      <machineKey 
         validationKey="8E074B186056F889587355255B167DA297AD837E43FD9850" 
         decryptionKey="991D4DEB57A2263855C31AA1D3FF4F1AD508A53D2A94658F"
validation="SHA1"
      />
      <authentication mode="Forms"/>
      <membership defaultProvider="DemoMembershipProvider">
         <providers>
            <add 
               name="DemoMembershipProvider" 
               type="System.Web.Security.SqlMembershipProvider,
System.Web, Version=2.0.0.0, Culture=neutral,
PublicKeyToken=b03f5f7f11d50a3a" 
               connectionStringName="MembershipDatabaseCNX" 
               enablePasswordRetrieval="false" 
               enablePasswordReset="true" 
               requiresQuestionAndAnswer="true" 
               applicationName="/" 
               requiresUniqueEmail="false" 
               passwordFormat="Hashed" 
               maxInvalidPasswordAttempts="5" 
               minRequiredPasswordLength="7" 
               minRequiredNonalphanumericCharacters="1" 
               passwordAttemptWindow="10" 
               passwordStrengthRegularExpression=""
            />
         </providers>
      </membership>
      <roleManager enabled="true" defaultProvider="DemoRoleProvider">
         <providers>
            <add 
               name="DemoRoleProvider" 
               connectionStringName="MembershipDatabaseCNX" 
               applicationName="/" 
               type="System.Web.Security.SqlRoleProvider, System.Web,
Version=2.0.0.0, Culture=neutral,
PublicKeyToken=b03f5f7f11d50a3a"
            />
         </providers>
      </roleManager>
   </system.web>
</configuration>

I've bolded a few areas of Listing 01 because you will need to modify them to work on your system:

  1. Replace the machineKey element from the listing with the machine key element in the Web.config from your SharePoint site. The machine key from the listing is the machineKey from my SharePoint site (on a VPC local to my box, so calm down you crazy Hax0rs) so it won't do you much good. The machineKey element changes from site to site, so make sure you get it from the site you want to configure for Forms authentication and not another site, or the SharePoint Central Administration site. You need matching machineKeys in the web application and the SharePoint site because user passwords are hashed (one way encrypted) and the hash routine uses the machine key value as part of the hashing algorithm.

  2. Make sure your connection string points at the appropriate server that houses the membership database you just created. Also make sure the appropriate credentials are supplied to the connection string.
  3. You can name your connection string anything you want, just make sure you use the same name later on in the connectionStrngName parameter for the membership and roleManager provider configurations.
  4. Make sure your applicationName parameters match in both the membership and roleManager provider configurations. The SqlMembershipProvider allows multiple applications to use the same membership database, so a mismatched name makes the provider think there are two applications instead of one and your members and roles won't associate correctly.

  5. Feel free to configure the password settings of the membership provider as you see fit.

Once you have the configuration settings in place for your web application, you need a way to add users. If you are using Visual Studio 2005, you can use the built-in Web Site Administration Tool:

  1. Click the Website menu and choose the ASP.NET Configuration menu item. This launches a new web browser window that displays the Web Site Administration Tool.
  2. Click on the Security tab or link.
  3. Click on the Create User link and create a new user. Remember the login information because you'll be needing it later.

If you do not have Visual Studio 2005, then you can use the CreateUserWizard control to add a new user to the membership database. It's not as nice as the Web Site Administration Tool interface, but it does get the job done. Create a new page named CreateUser.aspx and add the following markup to the file:

Listing 02 – CreateUser.aspx

<%@ Page Language="C#" %>
<!DOCTYPE html PUBLIC "-//W3C//DTD XHTML 1.0 Transitional//EN"
"http://www.w3.org/TR/xhtml1/DTD/xhtml1-transitional.dtd">
<html xmlns="http://www.w3.org/1999/xhtml" >
<head runat="server">
    <title>Create User Wizard</title>
</head>
<body>
    <form id="form1" runat="server">
        <asp:CreateUserWizard ID="CreateUserWizard1"
runat="server"></asp:CreateUserWizard>
    </form>
</body>
</html>

Once you save the file, navigate to the CreateUser.aspx page using your browser and create a new user. One way or another, you should have a user in the membership database at this point.

Step 3: Configure SharePoint Central Administration Web.config

Now that you have a user in the membership database, you've got to let SharePoint know that the user exists and grant the user access to your SharePoint site, which means configuring your site to use Forms authentication. You configure authentication through the SharePoint Central Administration web interface, but Central Administration needs to know about your membership and roleManager providers before that configuration can take place. That means you have to add the appropriate <connectionString>, <membership>, and <roleManager> configuration elements to the Central Administration Web.config. The configuration for Central Administration is almost identical to Listing 01, but this time around you do NOT set the defaultProvider attribute on the <membership> and <roleManager> elements, and do not set the enabled attribute on the <roleManager> element. Also, the Web.config for Central Administration already contains a great deal of configuration data, so make sure you do not accidentally remove or modify any existing settings.

Open the Central Administration's Web.config. If you do not know where this is located, use the IIS Manager to determine the home directory for Central Administration and open the Web.config from that directory.

Add the following configuration elements to the Central Administration's Web.config. Please note that some element, like <membership>, <connectionStrings>, and <roleManager>, may already exist in the Web.config. If they do, add the child elements to the existing item.

Listing 03 – Additions to the Central Administration Web.config

<?xml version="1.0"?>
<configuration xmlns=
"http://schemas.microsoft.com/.NetConfiguration/v2.0">
   ...
   <connectionStrings> <!-- element may already exist -->
      <add name="MembershipDatabaseCNX"
connectionString="SERVER=localhost;
DATABASE=MembershipDatabase;
TRUSTED_CONNECTION=true;"/>
   </connectionStrings>
   ...
   <system.web>
      ...
      <membership> <!-- element may already exist -->
         <providers> <!-- element may already exist -->
            <add 
               name="DemoMembershipProvider" 
               type="System.Web.Security.SqlMembershipProvider,
System.Web, Version=2.0.0.0, Culture=neutral,
PublicKeyToken=b03f5f7f11d50a3a" 
               connectionStringName="MembershipDatabaseCNX" 
               enablePasswordRetrieval="false" 
               enablePasswordReset="true" 
               requiresQuestionAndAnswer="true" 
               applicationName="/" 
               requiresUniqueEmail="false" 
               passwordFormat="Hashed" 
               maxInvalidPasswordAttempts="5" 
               minRequiredPasswordLength="7" 
               minRequiredNonalphanumericCharacters="1" 
               passwordAttemptWindow="10" 
               passwordStrengthRegularExpression=""
            />
         </providers>
      </membership>
      <roleManager> <!-- element may already exist -->
         <providers> <!-- element may already exist -->
            <add 
               name="DemoRoleProvider" 
               connectionStringName="MembershipDatabaseCNX" 
               applicationName="/" 
               type="System.Web.Security.SqlRoleProvider,
System.Web, Version=2.0.0.0, Culture=neutral,
PublicKeyToken=b03f5f7f11d50a3a"
            />
         </providers>
      </roleManager>
      ...
   </system.web>
   ...
</configuration>

Now the Central Administration knows about your provider configurations. You would think that having the information in the "SharePoint Central Administration" would be enough, but no. You've got to add it to the Web.config in your SharePoint site as well.

NOTE: Notice that Listing 03 never refers to the machineKey. Not even once. This is because you should not mess with the machineKey in SharePoint Central Administration. Leave it alone. Do not change it. Do not delete it. Your provider does not do any encrypting or hashing from the Central Administration, so you don't have to synchronize the machineKey between the two sites. If you change the machineKey in Central Administration, bad things could happen.

Step 4: Configure SharePoint Site Web.config

At this point, you should be tired of messing with configuration settings, but the end is near. Go ahead and open the Web.config in the root directory of your SharePoint site, and make the same changes that you made to the SharePoint Central Administration's Web.config. Use Listing 03 as your guide. When you are finished, you need to set the defaultProvider attributes in the <membership> and <roleManager> elements, and the enabled attribute in the <roleManager> element, as shown in Listing 04.

Listing 04 – Attributes that appear in the SharePoint site Web.config (but not in the Central Administration Web.config)

<?xml version="1.0"?>
<configuration xmlns=
"http://schemas.microsoft.com/.NetConfiguration/v2.0">
   ...
   <system.web>
      ...
      <membership defaultProvider="DemoMembershipProvider">
         ...
      </membership>
      <roleManager enabled="true" defaultProvider="DemoRoleProvider">
         ...
      </roleManager>
      ...
   </system.web>
   ...
</configuration>

Once you've entered the configuration settings, SharePoint Central Administration and your SharePoint site have the settings required to enable Forms authentication. Time to jump back to the SharePoint Central Administration site.

Step 5: Enable Forms Authentication on the SharePoint site

You enable Forms Authentication for SharePoint sites using SharePoint Central Administration. Navigate to the Central Admin site using your browser. You can normally find a shortcut to the site in the Start menu:

Programs > Office Server 2007 > SharePoint 3.0 Central Administration 

Once the Central Administration Home page is loaded, click on the Application Management link on the left hand navigation bar. You are taken to the Application Management page, which displays a variety of administration links. Click on the Authentication Providers link under the Application Security section on the right hand column of the page. The Authentication Providers page loads, as shown in Figure 3.

Figure 3 – Authentication Providers screen

When working in SharePoint Central Administration website, make sure the correct Web Application is selected when you are about to change configuration settings; otherwise you'll be applying changes to the wrong site. There's a small light-blue bar in the content pane of the page that displays the current Web Application URL. Make sure it's the web application on which you want to enable Forms authentication. If it's not, click the little down-arrow next to the URL and choose "Change Web Application" from the drop down list. SharePoint then displays a popup window with a list of web application from which you may choose.

Once you have the right web application selected, the Authentication Providers page displays a list of the zones in that application. Click on the name of the zone in which you want to enable Forms authentication. The Edit Authentication page displays (Figure 4).

Figure 4 – Edit Authentication Page

In the Edit Authentication page, choose the "Forms" option for Authentication Type. The page refreshes and displays the Membership provider and Role manager sections. Enter DemoMembershipProvider in the Membership provider name textbox, and DemoRoleProvider in the Role manager name textbox, then click the Save button. You are taken back to the Authentication Providers screen, but your zone should now say DemoMembershipProvider under the Membership Provider Name column. Forms authentication is now enabled on the site.

Step 6: Authorize the Forms-based user to access the site

Now that Forms authentication is enabled on the site, you can hit the site and see the login form (Figure 6). Microsoft spared no expense making this the blandest form you'll ever see. You will probably want to customize it so it looks a lot nicer. Maybe include some text about how the user should enter their username and password. Nobody will read it, but it definitely makes a login form look like a login form. Anyway, if you enter your username and password, you will be successfully authenticated and then promptly denied access because you have no authorization to be in the site. So, how do you get authorization? You have to use the Site Collection Administrator account.

You may remember setting up a Site Collection Administrator when you first created the site a while back, and it was almost certainly a Windows user account. If you extended the site and have both a Windows zone and a Forms authentication zone, then you can login to the Windows zone and setup the Forms user in Site Settings as you would any other user.

If you have not extended the site, then you've only got one zone and its using Forms authentication. As such, the Windows account associated with the site collection administrator is effectively useless and you need to change the site collection administrator over to a Forms based account. To do this, open SharePoint Central Administration and click on the Application Management link in the left navigation menu. When the Application Management page displays, click the Site Collection Administrators link under the SharePoint Site Management section in the left-hand column of the page. The Site Collection Administrators page displays (Figure 5).

Figure 5 – Site Collection Administrators Page

On the Site Collection Administrators page, make sure that correct site collection is selected. Then, enter the username of the user you created back in Step 2 in the Primary Site Collection Administrator textbox. Click on the Check Names icon (the little red guy with a check mark) next to the textbox. It may take a few seconds, but the page should underline the text in the textbox indicating that the username is valid. If the username is not valid, the page puts a red squiggly line under the username and informs you that the user was not found. If the user is not found, make sure you typed the name correctly. If the issue persists, go back and check your configuration settings to ensure the connection string is valid and there are no typos.

Click on the OK button to save the changes. Your Forms authentication account is now a Site Collection Administrator who has authorization to visit the site. You can use that account to get into the site and setup additional Forms authentication users in Site Settings.

Step 7- Add Site Collection Administrator for Form based Site

Navigate to Central Administration and Click on Application Management and then Click on "Policy for Web Appliction" under Application Security section. Then Click on Add Users. Then Choose the Web Application for which you want to add the site collection administrator. Choose the Extranet Zone and Click Next. Add Users which are part of MemberShip Databse. Now you can login using this user in the form based site. After that you can add users.

Step 8: Login

When you access the site, you are presented with the previously-mentioned default SharePoint login page (Figure 6). Enter your username and password, and then click the Sign In button. You should be authenticated and authorized, and the site should display as you would expect.

Figure 6 – SharePoint Forms Authentication Login Page

Forms Authentication and the search crawler

If you are planning on using the searching capabilities of SharePoint, then you need to know one major obstacle with Forms authentication. The search crawler can only access zones configured for Windows authentication. If your crawler is pointed at the default zone, and then you change the default zone to use Forms authentication, then your search is going to break. To get around this issue, extend your web application and create a zone that uses Windows authentication, then point the crawler at the new zone. Even though the search is hitting a different zone, the search findings will be available in your Forms authentication zone.

Conclusion

Once you know how to do it, getting Forms authentication up and running on a SharePoint site is fairly easy. You still have a bit of work to do getting your security planned out and adding users and roles to the site, but that's the case with almost any SharePoint project. I would also highly recommend customizing the Forms login page since it's not much better looking out of the box than the browser based password dialog you're trying to avoid in the first place.

ASP.NET Tips & Tricks

on Monday, September 21, 2009

MasterPages are a great addition to the ASP.NET 2.0 feature set, but are not without their quirks. This article will highlight the common problems developers face with master pages, and provide tips and tricks to use master pages to their fullest potential.


Master pages are a great addition to the ASP.NET 2.0  feature set. Master pages help us build consistent and maintainable user interfaces. Master pages, however, are not without their quirks. Sometimes master page behavior is surprising, and indeed the very name master page can be a bit misleading. In this article, we are going to examine some of the common problems developers run into when using master pages, and demonstrate some practical advice for making effective use of master pages. For an introduction to master pages, see "Master Pages In ASP.NET 2.0".

To make use of master pages, we first need to understand how master pages work. Many of the tips and traps covered later in this article revolve around understanding the magic behind master pages. Let’s dig into these implementation details first.

For Internal Use Only


When a web request arrives for an ASP.NET web form using a master page, the content page (.aspx) and master page (.master) merge their content together to produce a single page. Let’s say we are using the following, simple master page.

<%@ Master Language="VB" %>

<html xmlns="http://www.w3.org/1999/xhtml">
<
head runat="server">
  <title>Untitled Page</title>
</
head>
<
body>
  <form id="form1" runat="server">
    <div>
      <asp:ContentPlaceHolder ID="ContentPlaceHolder1" runat="server">
      </asp:ContentPlaceHolder>
    </div>
  </form>
</
body>
</
html>

The master page contains some common elements, like a head tag. The most important server-side controls are the form tag (form1) and the ContentPlaceHolder (ContentPlaceHolder1). Let’s also write a simple web form to use our master page.

<%@ Page Language="C#" MasterPageFile="~/Master1.master"
        
AutoEventWireup="true" Title="Untitled Page"  %>
<asp:Content ID="Content1" Runat="Server"
            
ContentPlaceHolderID="ContentPlaceHolder1" >
  <asp:Label ID="Label1" runat="server" Text="Hello, World"/>
</
asp:Content>


The web form contains a single Content control, which in turn is the proud parent of a Label. We can visualize what the object hierarchies would look like at runtime with the following diagram.

MasterPage and Page objects before merge

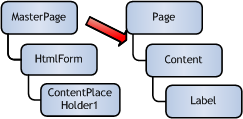
At this point, the page and master page are two separate objects, each with their own children. When it comes time for the master page to do its job, the master page replaces the page’s children with itself.

After merge, before content

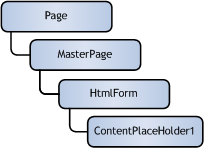
The master page’s next step is to look for Content controls in the controls formerly associated with the page. When the master page finds a Content control that matches a ContentPlaceHolder, it moves the controls into the matching ContentPlaceHolder. In our simple setup, the master page will find a match for ContentPlaceHolder1, and copy over the Label.

The final product

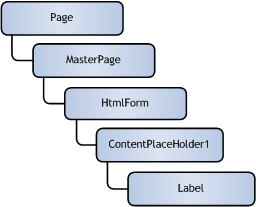
All of this work occurs after the content page’s PreInit event, but before the content page’s Init event. During this brief slice of time, the master page is deserving of its name. The master page is in control - giving orders and rearranging controls. However, by the time the Init event fires the master page becomes just another child control inside the page. In fact, the MasterPage class derives from the UserControl class. I’ve found it useful to only think of master pages as masters during design time. When the application is executing, it’s better to think of the master page as just another child control.


The Pre_Init event we just mentioned is a key event to examine if we want to change the master page file programmatically. This is the next topic for discussion.

Handling the PreInit Event

We can use the @ Page directive and the web.config to specify master page files for our web forms, but sometimes we want to set the master page programatically. A page’s MasterPageFile property sets the master page for the content page to use. If we try to set this property from the Load event, we will create an exception. In other words, the following code…

protected void Page_Load(object sender, EventArgs e)
{
  MasterPageFile =
"~/foo";
}

… creates the following exception.

The 'MasterPageFile' property can only be set in or before the 'Page_PreInit' event.

This exception makes sense, because we know the master page has to rearrange the page’s control hierarchy before the Init event fires. The simple solution is to just use the PreInit event, but we probably don’t want to write the PreInit event handler over and over for each web form in our application. Chances are good the PreInit event handler will need to look up the master page name from a database, or a cookie, or from some user preference settings. We don’t want to duplicate this code in every webform. A better idea is to create a base class in a class library project, or in the App_Code directory. (For a Visual Basic version of the code snippets in this section, see this post).

using System;
using System.Web.UI;

public class BasePage : Page
{
   
public BasePage()
   {
        
this.PreInit += new EventHandler(BasePage_PreInit);
   }

    
void BasePage_PreInit(object sender, EventArgs e)
    {
        MasterPageFile =
"~/Master1.master";
    }
}

To use this base class, we need to change our code-beside file classes to inherit from BaseClass instead of System.Web.UI.Page. For web forms with inline code, we just need to change the Inherits attribute of the @ Page directive.

<%@ Page Language="C#" MasterPageFile="~/Master1.master" 
         AutoEventWireup="true" Title="Untitled Page"
         Inherits="BasePage" %>

The inheritance approach is flexible. If a specific page doesn’t want it’s master page set, it can choose not to derive from BasePage. This is useful if different areas of an application use different master pages. However, there may be times when we want an application to enforce a specific master page. It could be the same type of scenario (we pull the master page name from a database), but we don’t want to depend on developers to derive from a specific base class (imagine a third party uploading content pages). In this scenario we can factor the PreInit code out of the base class and into an HttpModule.

HttpModules sit in the ASP.NET processing pipeline and can listen for events during the processing lifecycle. Modules are good solutions when the behavior you want to achieve is orthogonal to the page processing. For instance, authentication, authorization, session state, and profiles are all implemented as HttpModules by the ASP.NET runtime. You can plug-in and remove these modules to add or discard their functionality. Here is a module to set the MasterPageFile property on every Page object.

using System;
using System.Web;
using System.Web.UI;

public class MasterPageModule : IHttpModule
{  
    
public void Init(HttpApplication context)
    {
        context.PreRequestHandlerExecute +=
new EventHandler(context_PreRequestHandlerExecute);
    }

    
void context_PreRequestHandlerExecute(object sender, EventArgs e)
    {
        
Page page = HttpContext.Current.CurrentHandler as Page;
        
if (page != null)
        {
            page.PreInit +=
new EventHandler(page_PreInit);
        }
    }

    
void page_PreInit(object sender, EventArgs e)
    {
        
Page page = sender as Page;
        
if (page != null)
        {
            page.MasterPageFile =
"~/Master1.master";
        }
    }

    
public void Dispose()
    {
    }
}

When the module initializes, it hooks the PreRequestHandlerExecute event. The PreRequestHandlerExecute fires just before ASP.NET begins to execute a page. During the event handler, we first check to see if ASP.NET is going to execute a Page handler (this event will also fire for .asmx and .ashx files, which don’t have a MasterPageFile property). We hook the page’s PreInit event. During the PreInit event handler we set the MasterPageFile property. Again, the event handler might look up the filename from the database, or a cookie, or a session object, which is useful when you give a user different layouts to choose from.

To use the module, we just need to add an entry to the application’s web.config.

<httpModules>
   <
add name="MyMasterPageModule" type="MasterPageModule"/>
</
httpModules>

Abstract Interaction

Now it’s time to have the master page and content page interact. There are different approaches we can take to achieve interaction, but the best approaches are the ones that use the master page for what it is: a user control. First, let’s look at how the content page can interact with the master page.

Content Page to Master Page Interaction

Let’s imagine we want all of the pages in our application to have some text in a footer area. This seems like the perfect job for a master page, so we will add a label control to our master.

<form id="form1" runat="server">
 <
div>
    <asp:contentplaceholder id="ContentPlaceHolder1" runat="server">
    </asp:contentplaceholder>
 </
div>

 <
asp:Label runat="server" ID="FooterLabel"
          
Text="Default footer text"
/>

</
form>

The catch is, some content pages need to override the default footer text. Here is one approach we can use from page’s Page_Load event handler.

Protected Sub Page_Load(ByVal sender As Object, _
                        
ByVal e As EventArgs)

  
Dim footer As Label = Master.FindControl("FooterLabel")
  
If Not footer Is Nothing Then
    footer.Text = "Custom footer text!!"
  End If
  
End Sub

Use the above approach with extreme caution. FindControl is fragile, and will return null if someone renames FooterLabel, or removes the control entirely. This problem can't be discovered until runtime. FindControl also has some additional difficulties when INamingContainers are involved - we will discuss this topic later.

A better approach is to establish a formal relationship between the master page and content page, and take advantage of strong typing. Instead of the content page poking around inside the master page, let’s have the master page expose the footer text as a property. We can add the following code to our master page.

Public Property FooterText() As String
  Get
    Return FooterLabel.Text
  
End Get
  Set(ByVal value As String)
    FooterLabel.Text = value
  
End Set
End
Property

The best way to use this property is to place a @ MasterType directive in our content page. When the ASP.NET compiler sees the @ MasterType directive, it creates a strongly typed Master property in our Page derived class.

<%@ Page Language="VB" MasterPageFile="~/Master1.master"
        
AutoEventWireup="true"  %>
<%
@ MasterType VirtualPath="~/Master1.master" %>

<script runat="server">
  
  
Protected Sub Page_Load(ByVal sender As Object, ByVal e As System.EventArgs)

    Master.FooterText =
"Custom footer text"
    
  
End Sub
  
</script>

This code is a cleaner and doesn’t depend on the magic string “FooterLabel”. If anyone ever removes the control from the master page, or renames the control, we will have compilation errors instead of runtime problems.

What if we have 2 different master pages in the application? In this scenario, we have a problem, because the VirtualPath attribute supports only a single master page. We’ve tightly coupled our page to a specific master. If we assign a MasterPageFile that does not match the MasterType, the runtime will throw an exception.

Unable to cast object of type 'ASP.master2_master' to type 'ASP.master1_master'.

Fortunately, the @ MasterType directive doesn’t require us to use a VirtualPath, we can also specify a type name. Once again we will turn to inheritance to solve this problem. If all the content pages expect their master pages to have footer text, then let’s define a base class for the master pages to inherit.

We can take one of two approaches with the base class. One approach is to use an abstract (MustInherit) base class:

using System.Web.UI;

public abstract class BaseMasterPage : MasterPage
{
    
public abstract string FooterText
    {
        
get;
        
set;
    }
}

Our master pages must inherit from this base class and override the FooterText property.

<%@ Master Language="VB" Inherits="BaseMasterPage" %>

<script runat="server">

  Public Overrides Property FooterText() As String
    Get
      Return FooterLabel.Text
    
End Get
    Set(ByVal value As String)
      FooterLabel.Text = value
    
End Set
  End Property

</
script>

Now our page can use any master page that inherits from BaseMasterPage. All we need is an @ MasterType directive set to the base class. Instead of using a VirtualPath attribute, we use a TypeName attribute and specify the name of the base class.

<%@ Page Language="VB" MasterPageFile="~/Master1.master"
        
AutoEventWireup="true"  %>
<%
@ MasterType TypeName="BaseMasterPage" %>

<script runat="server">
  
  
Protected Sub Page_Load(ByVal sender As Object, _
                          
ByVal e As EventArgs)

    Master.FooterText =
"Use the base class..."
    
  
End Sub
  
</script>

The second approach is to use a concrete base class. This approach is possible only if we are sure every master page will have a label with an ID of “FooterLabel”.

using System.Web.UI;
using System.Web.UI.WebControls;

public class BaseMasterPage : MasterPage
{
    
protected Label FooterLabel;
    
public string FooterText
    {
        
get
        {
            
return FooterLabel.Text;
        }
        
set
        {
            FooterLabel.Text =
value;
        }
    }
}

With the above approach we can remove code from our master page – we don’t need to define the FooterText property. If we are using code-beside files instead of inline script, we need to use CodeFileBaseClass=”BaseMasterPage” in the @ Master directive to ensure ASP.NET can wire up the base class’s Label field with the Label control.

Master Page To Content Page Interaction

Here is a case where the master part of the master page name can be misleading. The master page sounds like a good place to put logic and code that will tell the page how to do something. After all, a master page is the master, right? We now know that the master page is just another child control. Ideally, the master page will remain passive. Instead of telling it’s parent page what to do, the master page should tell a page when something interesting happenes, and let the page decide what to do.

Let’s pretend every page in our application displays a report, and every page needs a button for users to click and email the report. Putting a Button and a TextBox inside the master page seems like a reasonable choice.


<asp:TextBox runat="server" id="EmailAddressBox" />
<
asp:Button runat="server" ID="SendEmailButton"
            
OnClick="SendEmailButton_Click" />

What happens when the user clicks the button? We can choose from the following options:

  • Handle the Click event in the master page, and have the master page email the report.
  • Expose the Button and TextBox as public properties of the master page, and let the content page subscribe to the click event (and email the report).
  • Define a custom SendEmail event, and let each page subscribe to the event.

The first approach can be ugly because the master page will need to call methods and properties on the page. Master pages are about layout, we don’t want to clutter them with knowledge of reports and specific pages.

The second approach is workable, but it tightly couples the page to the master. We might change the UI one day and use a DropDownList and a Menu control instead of a TextBox and Button, in which case we’ll end up changing all of our pages.

The third approach decouples the master page and content page nicely. The page won’t need to know what controls are on the master page, and the master page doesn’t have to know anything about reports, or the content page itself. We could start by defining the event in a class library, or in a class file in App_Code.

using System;

public class SendEmailEventArgs : EventArgs
{
    
public SendEmailEventArgs(string toAddress)
    {
        _toAddress = toAddress;
    }

    
private string _toAddress;
    
public string ToAddress
    {
        
get { return _toAddress; }
        
set { _toAddress = value; }
    }
   
}

public delegate void SendEmailEventHandler(
        
object sender, SendEmailEventArgs e);

We can raise this event from a master page base class (if we have one), or from the master page itself. In this example, we will raise the event directly from the master page.

<%@ Master Language="VB" %>

<script runat="server">

  Public Event SendEmail As SendEmailEventHandler
  
  
Protected Sub SendEmailButton_Click(ByVal sender As Object, _
                                      
ByVal e As System.EventArgs)
    
    
Dim eventArgs As New SendEmailEventArgs(EmailAddressBox.Text)
    
RaiseEvent SendEmail(Me, eventArgs)
    
  
End Sub
  
</script>


We'll need to add some validation logic to the master page, but at this point all we need is to handle the event in our page. We could also handle the event from a base page class, if we don’t want to duplicate this code for every page.

<%@ Page Language="VB" MasterPageFile="~/Master1.master"
        
AutoEventWireup="true"  %>
<%
@ MasterType VirtualPath="~/Master1.master" %>

<script runat="server">  

  
Protected Sub Page_Init(ByVal sender As Object, ByVal e As System.EventArgs)
    
AddHandler Master.SendEmail, AddressOf EmailReport
  
End Sub
  
  
Protected Sub EmailReport(ByVal sender As Object, ByVal e As SendEmailEventArgs)
    
    
Dim address As String = e.ToAddress
    
    
' do work
    
  
End Sub
  
</script>

Master Pages and Cross Page Postbacks

Another common scenario for master pages is to use a cross page post back. This is when a control on the master page POSTs to a second web form. For more information on cross page post backs, see “Design Considerations for Cross page Post Backs in ASP.NET 2.0”. Let’s add search functionality to our site by adding a TextBox and Button to the master page.

<asp:TextBox runat="server" id="QueryBox" />
<
asp:Button runat="server" ID="SearchButton"
            
PostBackUrl="~/SearchResults.aspx" />

When the user click the search button, the web request will ultimately arrive at the SearchResults.aspx. How will SearchResults.aspx find the text the user wants to search for? We could use the PreviousPage.Master property and FindControl to locate the QueryBox TextBox by its ID, but we’ve already discussed some reasons to avoid FindControl when possible.

What about the exposing the text as a property? It sounds easy, but...

In ASP.NET 2.0, each master page and web form can compile into a separate assembly. Unless we establish a reference between two assemblies, the types inside each assembly cannot see one another. The @ MasterType directive with a VirtualPath attribute ensures the web form’s assembly will reference the master page assembly. If our SearchResults.aspx page uses the same @ MasterType directive as the POSTing web form, it will be able to see the master page type, and life is simple.

Let’s assume our SearchResults.aspx page does not use a master page, and we don’t want to use FindControl. Inheritance is once again a solution to this problem. We will need a base class (or an interface) defined in App_Code or a class library (all web form and master page assemblies reference the App_Code assembly). Here is a base class solution.

public class BaseMasterPage : MasterPage
{
    
protected Label PageFooter;
    
protected TextBox QueryBox;

    
public string QueryText
    {
        
get { return QueryBox.Text; }
    }

    
// ...

SearchResults.aspx will assume the PreviousPage.Master property references a type derived from BaseMasterPage.

Protected Sub Page_Load(ByVal sender As Object, _
                        
ByVal e As EventArgs)
  
  
If Not PreviousPage Is Nothing AndAlso _
     
Not PreviousPage.Master Is Nothing Then

    Dim master As BaseMasterPage
    master =
DirectCast(PreviousPage.Master, BaseMasterPage)
    
    
Dim searchTerm As String
    searchTerm = master.QueryText
    
    
' do search
    
  
End If

While the above approach works pretty, well, you might consider going a step further. Define an interface with a QueryText property and derive a base page (not master page) class from the interface. The base page class can go to the trouble of getting the text from the master page. Now, SearchResults.aspx doesn’t have to worry about master pages at all. It can use a cast to get a reference to the interface from the PreviousPage reference, and then ask the interface for the QueryText. Any type of page can then post to SearchResults, even those without a master page.

A Curious Turn of Events

Another master page twist that catches developers off guard is the order of the page lifecycle events. Let’s say we write the following code in our web form:

Protected Sub Page_Load(ByVal sender As Object, _
                      
ByVal e As System.EventArgs)
  Response.Write(
"Hello from Page_Load in default.aspx <br>")
End Sub

.. and the following code in our master page:

Protected Sub Page_Load(ByVal sender As Object, _
                      
ByVal e As System.EventArgs)
  Response.Write(
"Hello from Page_Load in Master1.master<br>")
End Sub

Pop quiz: which Response.Write will appear in the output first?

Hint: most ASP.NET events are raised starting at the top of the control tree and working downward.

In this case, “Hello from Page_Load in default.aspx” will appear before “Hello from Page_Load in Master1.master”, because the content page’s Load event fires before the master page’s Load event.

Let’s set up another quiz using the following code in our content page.

Protected Sub Page_Init(ByVal sender As Object, _
                    
ByVal e As System.EventArgs)
  Response.Write(
"Hello from Page_Init in default.aspx <br>")
End Sub

... and the following code in our master page.

Protected Sub Page_Init(ByVal sender As Object, _
                      
ByVal e As System.EventArgs)
  Response.Write(
"Hello from Page_Init in Master1.master<br>")
End Sub

Pop quiz: which Init event will fire first?

Earlier we said most ASP.NET events work their way down the tree of controls. The truth is all lifecycle events (Load, PreRender, etc.) work in this fashion except the Init event. The initialization event works from the inside out. Since the master page is inside the content page, the master page’s Init event handler will fire before the content page’s Init event handler.


Obviously, problems will occur if the content page’s Load event handler depends on the master page's Load event to finish some work or initialize a reference. If you find yourself with this problem, or are worried about the order of events when a master page is involved, you might be too tightly coupled to the master page. Consider our earlier approach of using a custom event when when something interesting happens in the master page, and let the content page subscribe to the event and take action. This approach achieves greater flexibility.

Headers, Scripts, and Meta Tags, Too

Generally, master pages will take care of including the HTML head tag. The HTML head tag can include a <title> tag (to set the page title), one or more <script> tags (to include JavaScript libraries), and one or more <meta> tags (to include meta data about the page). A content page will often need to modify or augment the contents of the head tag. The title tag is a good example, because the master page can’t set the title for each content page in an application. Only the content pages know what thier title will be. Fortunately, ASP.NET provides a public property on the Page class, and we can set a content page’s title declaratively in the @ Page directive.

<%@ Page Language="VB" MasterPageFile="~/Master1.master"
         AutoEventWireup="true" Title="Home"
%>

If we want to add script or meta tags from a content page, we have more work to do. Here is an example of injecting a redirection meta tag: 

Protected Sub Page_Load(ByVal sender As Object, _
                      
ByVal e As System.EventArgs)
                          
  Dim metaTag As New HtmlMeta
  metaTag.HttpEquiv =
"Refresh"
  metaTag.Content = "2;URL=http://www.OdeToCode.com"
  Header.Controls.Add(metaTag)

End Sub

The Page class contains a public property named Header. Header gives us access to the head tag as a server side control (the head tag in the master page must include runat=”server” for the Header property to work). We can add style sheets to the header tag, too.

Protected Sub Page_Load(ByVal sender As Object, _
                        
ByVal e As System.EventArgs)
                            
  
Dim cssLink As New HtmlLink()
   cssLink.Href =
"~/styles.css"
   cssLink.Attributes.Add("rel", "stylesheet")
   cssLink.Attributes.Add(
"type", "text/css")
   Header.Controls.Add(cssLink)
  
End Sub

We can also add markup inside the head tag using an HtmlGenericControl, which provides TagName, InnerText, InnerHtml, and Attributes properties.

Header Place Holders

There is another approach we can use to modify the header, which does have one drawback. The ContentPlaceHolder and Content controls will merge even when we place a ContentPlaceHolder control outside of the <form> tag. Take the following master page excerpt as an example.

<head runat="server">
  <title>Untitled Page</title>
  <asp:ContentPlaceHolder id="headerPlaceHolder" runat="server" />
</
head>
<
body>
  <form id="form1" runat="server">
    <div>
      <asp:ContentPlaceHolder ID="ContentPlaceHolder1" runat="server">
      </asp:ContentPlaceHolder>
    </div>
    <asp:Label runat="server" ID="PageFooter" Text="Default footer text" />
  </form>
</
body>
</
html>

This master page uses a ContentPlaceHolder inside the head tag. Remember, a Content page isn’t required to provide a Content control for every ContentPlaceHolder control in a master page. If there is no Content control available for the master to merge into a ContentPlaceHolder, the master page uses the default content inside of the ContentPlaceHolder. In the above code, we did not specify any default content, but this is a trick to remember if you want to provide default content with the ability to replace the default content from any given content page.

With the ContentPlaceHolder above, any content page can add additional tags inside the head tag using a Content control.

<asp:Content ID="HeaderContent" runat="server"
             ContentPlaceHolderID
="headerPlaceHolder">
  <link rel="stylesheet" type="text/css" href="customstyles.css" />
            
</asp:Content
>

<
asp:Content ID="Content1" Runat="Server"
            
ContentPlaceHolderID="ContentPlaceHolder1" >
  <asp:Label ID="Label1" runat="server" Text="Hello, World"/>
</
asp:Content>

We mentioned there is a drawback to this approach -what is the catch?

The problem is that Visual Studio 2005 believes all ContentPlaceHolder controls should live inside the <form> tag. The ContentPlaceHolder we have inside the head tag will produce an error message in the Visual Studio Error List window. However, the project will compile and run without any complaints, exceptions, or error messages. The error appears to be generated by the Visual Studio validation engine. We could disable validation for the project, however, this disables validation of all HTML mark-up. You’ll have to decide if you can live the spurious validation error message before taking the ContentPlaceHolder approach.

A Page Directive Approach

A third approach is possible which provides the same flexibility and convenience of the Title attribute. For example, what if we wanted to set the meta keywords of a page in the @ Page directive?

<%@ Page Language="VB" MasterPageFile="~/Master1.master"
    AutoEventWireup="true" Title="Home" Inherits="BasePage"
    MetaKeywords="masterpage ASP.NET"
%>

To use the MetaKeywords attribute in every page of an application, we just need to inherit from a common base class that exposes a MetaKeywords property. The base class can also inject the meta tag into the page header.

using System;
using System.Web.UI;
using System.Web.UI.HtmlControls;

public class BasePage : Page
{
    
public BasePage()
    {
        Init +=
new EventHandler(BasePage_Init);
    }

    
void BasePage_Init(object sender, EventArgs e)
    {
        
if (!String.IsNullOrEmpty(MetaKeywords))
        {
            
HtmlMeta metaTag = new HtmlMeta();
            metaTag.Name =
"Content";
            metaTag.Content = MetaKeywords;
            Header.Controls.Add(metaTag);
        }
    }

    
private string _metaKeywords;
    
public string MetaKeywords
    {
        
get { return _metaKeywords; }
        
set { _metaKeywords = value; }
    }
}

FindControl, JavaScript, and Naming Containers

It’s important for us to understand why the following code throws a null reference exception.

<script runat="server">  
  
Protected Sub Page_Load(ByVal sender As Object, _
                          
ByVal e As System.EventArgs)
    
    Page.FindControl(
"Label1").Visible = False
    
  
End Sub
</
script>

<
asp:Content ID="Content1" Runat="Server"
            
ContentPlaceHolderID="ContentPlaceHolder1" >
  <asp:Label ID="Label1" runat="server" Text="Hello, World"/>
</
asp:Content>

FindControl in the above code returns a null (Nothing) reference. Why? Let’s turn to the FindControl documentation on MSDN.

FindControl searches the current naming container for the specified server control.

A naming container is any control that carries the INamingContainer interface. Both the MasterPage and Content controls are naming containers. The key to using FindControl is to invoke the method on the correct container, because FindControl doesn’t recursively traverse the entire hierarchy of controls. FindControl only searches inside the current naming container. Using the FindControl method on the Page reference means we won’t be searching inside of MasterPage control.  course, we don’t need to use FindControl in this scenario because our content page will have a Label1 field, but if you do need to use FindControl for a control in a content page, the following code will be helpful.

Protected Sub Page_Load(ByVal sender As Object, _
                      
ByVal e As System.EventArgs)

  Dim content As ContentPlaceHolder
  content = Page.Master.FindControl(
"ContentPlaceHolder1")

  Dim label As Label
  label = content.FindControl(
"Label1")
  label.Visible =
False


End Sub

First, our code has to find the ContentPlaceHolder containing the Label control. We will use the MasterPage control's FindCotnrol method. The MasterPage inside of our page is the naming container that contains ContentPlaceHolder1. If you are wondering why we are not using the Content1 control, it’s because no Content controls exist. Remember our early discussion on how master pages work. Master pages copy the controls inside of the Content controls into ContentPlaceHolder controls. The Content controls get left behind and don’t exist in the control hierarchy.

Once we have a reference to the ContentPlaceHolder control, we use FindControl a second time to locate the Label control. We could shorten all the above code into a single line:

Master.FindControl(...).FindControl(..).Visible = False
For more details on using FindControl, see “In Search Of ASP.NET Controls”.

Name Mangling

A naming container also mangles its children’s ClientID property. Mangling ensures all ClientID properties are unique on a page. For instance, the ID for our Label control is “Label1”, but the ClientID of the Label is “ctl00_ContentPlaceHolder1_Label1”. Each level of naming container prepends it’s ID to the control (the MasterPage control ID in this form is ctl00). Just as we have to be careful with FindControl, we have to be careful with client side script functions like getElementById. If we emit the following script into our page, it will fail with a JavaScript error: ‘Label1 is undefined’.


<script type="text/javascript">
<!--
Label1.innerHTML =
'Hello, from script!';
// -->
</script>

One 'solution' is to use the correct client side ID.

<script type="text/javascript">
  <!--
  ctl00_ContentPlaceHolder1_Label1.innerHTML =
'boo!';// -->
</script>

Of course, we’d never want to hardcode the client ID into a script. Typically we’ll need to build the script dynamically using StringBuilder or String.Format. Another alternative is to use markers in the script and use a call to String.Replace, like the following.

Dim script As String = "[Label1ID].innerHTML = 'boo!';"
Dim scriptKey As String = "SayBoo"
Dim addScriptTags As Boolean = True

Protected Sub Page_Load(ByVal sender As Object, _
                      
ByVal e As EventArgs)
    
  script = script.Replace(
"[Label1ID]", Label1.ClientID)

  ClientScript.RegisterStartupScript( _
    
Me.GetType(), scriptKey, script, addScriptTags _
  )

End Sub

Break Some URLs

Once again, let’s think back to the beginning of the article. At runtime, the master page and the content page are in the same control hierarchy – the master page is essentially a user control inside the content page. At design time, however, the master page and content page are two different entities. In fact, the master page and content page may live in different directories. During design time, it's easy to put URLs and relative paths into our master pages, but we have to be careful when using relative paths. Take the following master page excerpt as an example:.

<div>
  <img src="logo.gif" alt="Company Logo" />
  
  
<asp:ContentPlaceHolder ID="ContentPlaceHolder1" runat="server">
  </asp:ContentPlaceHolder>
</
div>

As long as the master page and the web form live in the same directory, the company logo will display in the browser. When the master page and web form live in different directories, the image will not appear. The browser requests knows nothing about master pages. The browser will interpret any relative paths it finds in the HTML as being relative to the webform. If our logo and master page files are in the root directory, but the web form is in a subdirectory, the browser will ask for logo.gif from the same subdirectory. The server will respond with a 404 (file not found) error.

The good news is, the ASP.NET runtime does provide a feature called “URL rebasing”. The runtime will try to “rebase” relative URLs it finds on server-side controls inside a master page. This means the following relative path will work, no matter where the master page and web form live.

<img src="logo.gif" alt="Company Logo" runat="server" />

We’ve added a runat=”server” attribute to the image tag, making the <img> a server-side control. When the master page file and logo are in the root directory, but the web form is in a subdirectory, the ASP.NET runtime will rebase the relative path it finds in the src attribute to point to the root of the website.

The following code will also work, because we are using a server-side Image object.

<asp:Image ImageUrl="logo.gif" runat="server" />

The ASP.NET runtime will also rebase paths it finds inside of the head tag. Take the following excerpt from a master page:

<head runat="server">
<title>Untitled Page</title>  
  
  
<link href="styles/styles.css" type="text/css" rel="stylesheet"/>    

</head>

If we request a webform from a subdirectory, the runtime will catch the href inside the link tag and rebase the URL to "../styles/styles.css". However, the runtime doesn’t catch everything. If we included our style sheet with the following code, the runtime won’t rebase the relative href.

<head runat="server">

  <style type="text/css" media="all">
    @import "styles/styles.css";
 
</style>
  
</head>

Also, the runtime doesn’t rebase URLs inside of embedded styles, and not all attributes are covered (the background attribute, for instance).

<body background="logo.gif" runat="server">
<!-- the background for the body tag will break -->
<form id="form1" runat="server">
  
  
<div id="Div1" style="background-image: url('logo.gif');" runat="server">
   <!-- My background is also broken. -->
  </div>

If you need to use a relative path in an area where the runtime does not provide the rebasing feature, you can compute a client side URL using ResolveClientUrl and passing a relative path. ResolveClientUrl, when called from inside a master page, will take into account the location of the master page, the location specified in the HTTP request, and the location specified by the relative path parameter to formulate the correct relative path to return.

<body background=<%= ResolveClientUrl("logo.gif") %> >

When working with image paths in embedded styles, it’s often a good idea to move the style definition into a .css file. The ASP.NET runtime will rebase the path it finds inside a link tag, so we won’t have any problems locating the stylesheet from any webform. Take the following style definition in a .css file:

body
{
   
background-image:url('images\logo.gif');
}

Relative paths are safe inside a .css file because the browser will always request logo.gif relative to the location of the stylesheet.

Master Pages and Themes

Master pages, being just another control inside a page, do not have a separate theme applied. Master pages use the theme specified by the page that is using them. For an introduction to themes and skins in ASP.NET 2.0, see “Themes in ASP.NET 2.0”.

Here is one question that comes up: how do we specify a control skin so that the skin only applies to controls on the master page? There is no direct method to pull this trick off, but ASP.NET themes do have the concept of skin IDs. There are two types of skins: default skins, and skins with a SkinID attribute. A default skin will apply to any control with the same type as the skin, but a skin with a SkinID will only apply to controls with the same type and SkinID.

As an example, let’s say we want to control a logo graphic in our application with the theme and skin infrastructure. We can define a skin for the logo like the following.

<asp:Image ID="Image1" runat="server" ImageUrl="Images/logo.gif" SkinID="logo" />

Notice the skin uses a relative path, so we can have a different logo graphic underneath each theme we define. ASP.NET will rebase the path to the gif file. The master page only needs to use the following markup.

<asp:Image ID="Image1" runat="server" SkinID="logo" />

Different logos can exist theme, and the skin we defined will only apply to Image controls with a SkinID of “logo”.

Nesting Master Pages

It’s possible for a page to specify a MasterPageFile that itself consists only of Content controls. The master page in this scenario would in turn specify another master page as its master. The master pages are nested, but carry out the same steps described in the beginning of the article. The child master page will first copy the content page’s content into its ContentPlaceHolder controls. Then the parent master page will copy the nested master page’s content into its own ContentPlaceHolder controls. In the end, the Page object will still be the top object in a control hierarchy that renders as HTML.

Although nested master pages work at runtime, they do not work in the Visual Studio 2005 designer. If we try to open a content page in design view and the content page uses a nested master page design, the designer will display an error message.

Design view does not support creating or editing nested master pages. To create or edit nested master pages, use Source view.

There is a trick to working around this problem.

Let’s suppose we have our top master page (Master1.master) defined as follows.


<%@ Master Language="VB" %>

<html xmlns="http://www.w3.org/1999/xhtml">
<
head runat="server">
  <title>Untitled Page</title>
</
head>
<
body>
  <form id="form1" runat="server">
    <div>
      <asp:ContentPlaceHolder ID="ContentPlaceHolder1" runat="server">
      </asp:ContentPlaceHolder>
    </div>
  </form>
</
body>
</
html>

Then, we create a second master page (Nested.master) that uses master1.master as a master page.

<%@ Master Language="VB" MasterPageFile="~/Master1.master" %>

<asp:Content runat="server" ID="Content1"  
            
ContentPlaceHolderID="ContentPlaceHolder1">
  
  
<h3>Nested Content</h3>          
  
<asp:contentplaceholder id="NestedContent" runat="server">
  </asp:contentplaceholder>
  
</asp:Content>

Finally, a content page which uses Nested.master as its MasterPageFile.

<%@ Page Language="VB" MasterPageFile="~/Nested.master"  %>
<asp:Content ID="Content1" ContentPlaceHolderID="NestedContent" Runat="Server">
</
asp:Content>

If we attempt to view this content page in design view, Visual Studio will produce the error message shown earlier. If we really want to use the designer with our content page, we can leave the MasterPageFile attribute empty, like in the following code:

<%@ Page Language="VB" MasterPageFile=""  %>
<asp:Content ID="Content1" ContentPlaceHolderID="NestedContent" Runat="Server">
</
asp:Content>

We can’t just drop the MasterPageFile attribute from the @ Page directive, because the designer will raise a different error (“Content controls are allowed only in content page that references a master page”). The empty attribute appears to trick the designer into allowing us into design mode.

At runtime, however, the page will throw an exception because it doesn’t have a master file. We can avoid the exception by programmatically setting the MasterPageFile property at runtime. We know we will need to set the master page before or during the PreInit event. The following code reads the masterPageFile attribute from the <pages> section of web.config. By putting the code into a base class, we can cover all the content pages in an application.

using System;
using System.Web.UI;
using System.Web.Configuration;
using System.Configuration;

public class BaseContentPage : Page
{
    
protected override void OnPreInit(EventArgs e)
    {
        
base.OnPreInit(e);

        
PagesSection pagesConfig =
            
ConfigurationManager.GetSection("system.web/pages")
                
as PagesSection;

        MasterPageFile = pagesConfig.MasterPageFile;
    }
}

Sharing Master Pages

Many people want to create a single master page, or set of master pages to use across multiple applications. Unfortunately, there is no built-in capability to share master pages, and this article will only provide some advice. The ultimate goal is the ability to modify a master page once, and have the changes reflected in multiple applications with the least effort.

The first alternative is to copy shared master page files into a single location on an IIS web server. Each application can then create a virtual directory as a subdirectory and point the virtual directory to the real directory of master pages. The applications can then set the MasterPageFile property of a page to the name of the virtual directory, plus the name of the master page file. When we drop an updated master page file into the real directory, the new master page will appear in all the applications immediately.

A second approach is to use a version control system to share a set of master page files across multiple projects. Most source control / version control systems support some level of “share” functionality, where a file or folder can appear in more than one project. When a developer checks in an updated master page file, the other projects will see the change immediately (although this behavior is generally configurable). In production and test, each application would need to be redeployed for the update master page to appear.

Finally, the VirtualPathProvider in ASP.NET 2.0 can serve files that do not exist on the file system. With the VirtualPathProvider, a set of master pages could live in database tables that all applications use. For an excellent article on the VirutalPathProvider, see “Virtualizing Access to Content: Serving Your Web Site from a ZIP File”.

Conclusions

The one point we should take away from this article is that we shouldn’t treat master pages as the “masters”, but as just another control inside the page. Many design and runtime problems become easier to solve with this method of thinking. We’ve seen how to handle events, how to handle interactions in both directions, and how to avoid problems with JavaScript and relative URLs. In all of these cases we can treat the master page as a user control inside the page, and have a solid solution.